Curious About the Zillow 3D Home App? Here’s Our Review and a Tutorial
Zillow’s new free 3D Home app makes it super easy to create virtual tours that will engage home buyers and get your Zillow listing bumped up in search results. Even better? The tour automatically syncs to your Zillow listing–no extra steps required! We’ve created a Zillow 3D Home tour tutorial to show you how to create a tour of your own, but we’ve also got some exciting news:
We’ve been testing 3D Home using the Ricoh Theta Z1 camera for some of our clients, and have liked it so much we’re adding Zillow virtual tours to our roster of offerings for real estate clients.
Here are our thoughts on the Zillow 3D Home app when using an iPhone versus the Ricoh Theta camera:
Zillow 3D Home Review
With the Zillow 3D Home App, you have two options to capture panoramas:
- Your iPhone camera
- A Ricoh Theta camera (a V or Z1) that connects with the app
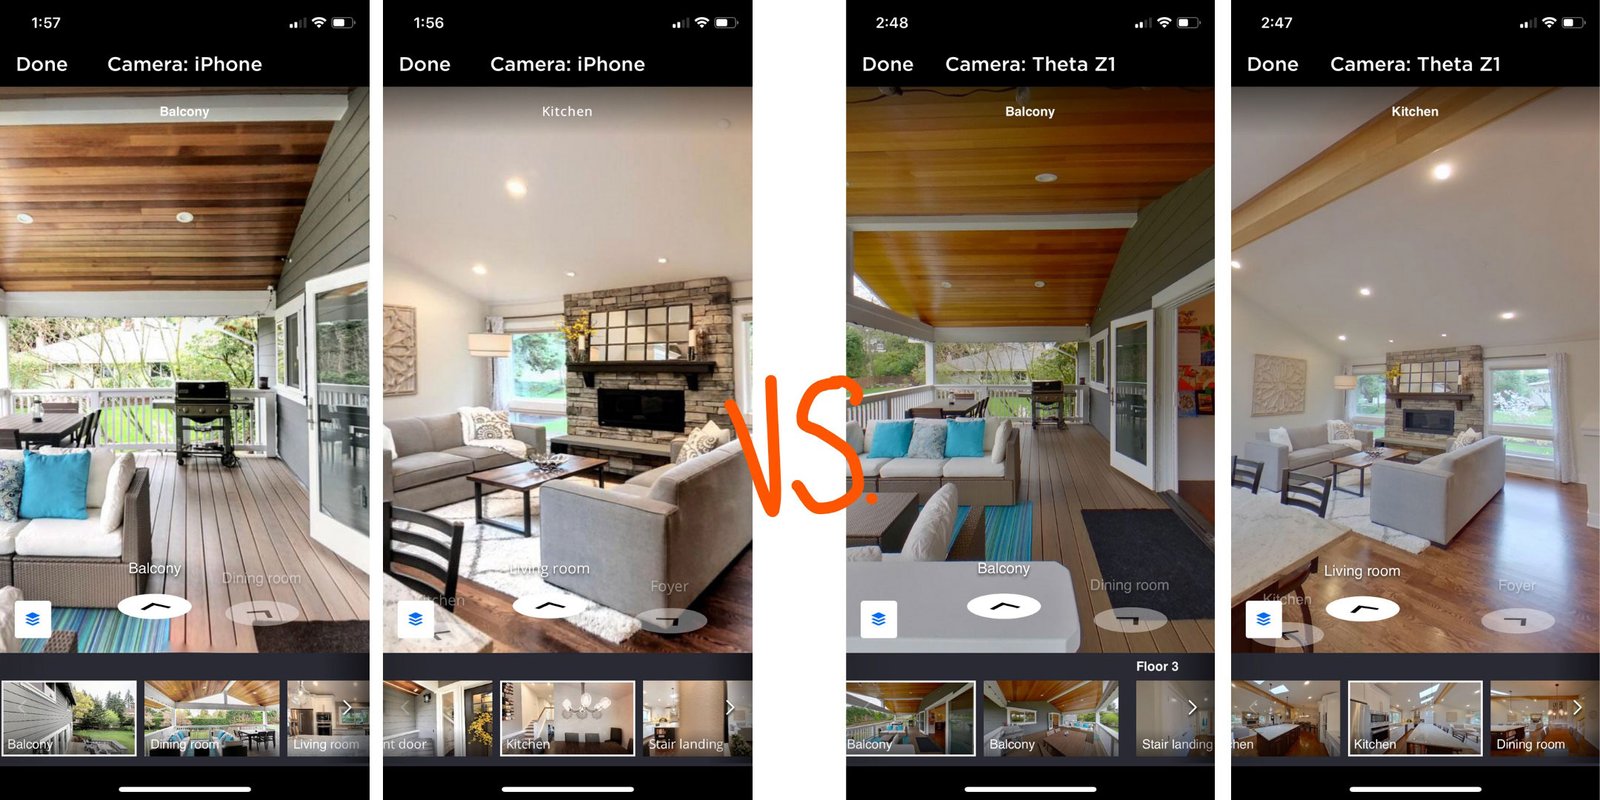
While the the ability to use the phone camera is cool, we’ve found that using the Ricoh Theta camera makes for sharper images and an overall better virtual tour. Here’s a comparison of the two tours side by side:
iPhone Camera Pros:
- Simple, easy-to-learn process
- Virtual Tours can be built on an iPhone
iPhone Camera Cons:
- Lower quality images and limited field of view
- The app isn’t yet available for Android phones
Ricoh Theta Z1 Camera Pros:
- Wider 360 x 180 field of view which allows a viewer to see more of the space
- Better image quality
- Quicker home capturing
Ricoh Theta Z1 Camera Cons:
- Expensive initial purchase to get the camera
If you want to try to build a 3D Home tour using your iPhone, we’ve created a tutorial to help you! Check it out below:
Zillow 3D Home Tour Tutorial (using an iPhone camera)
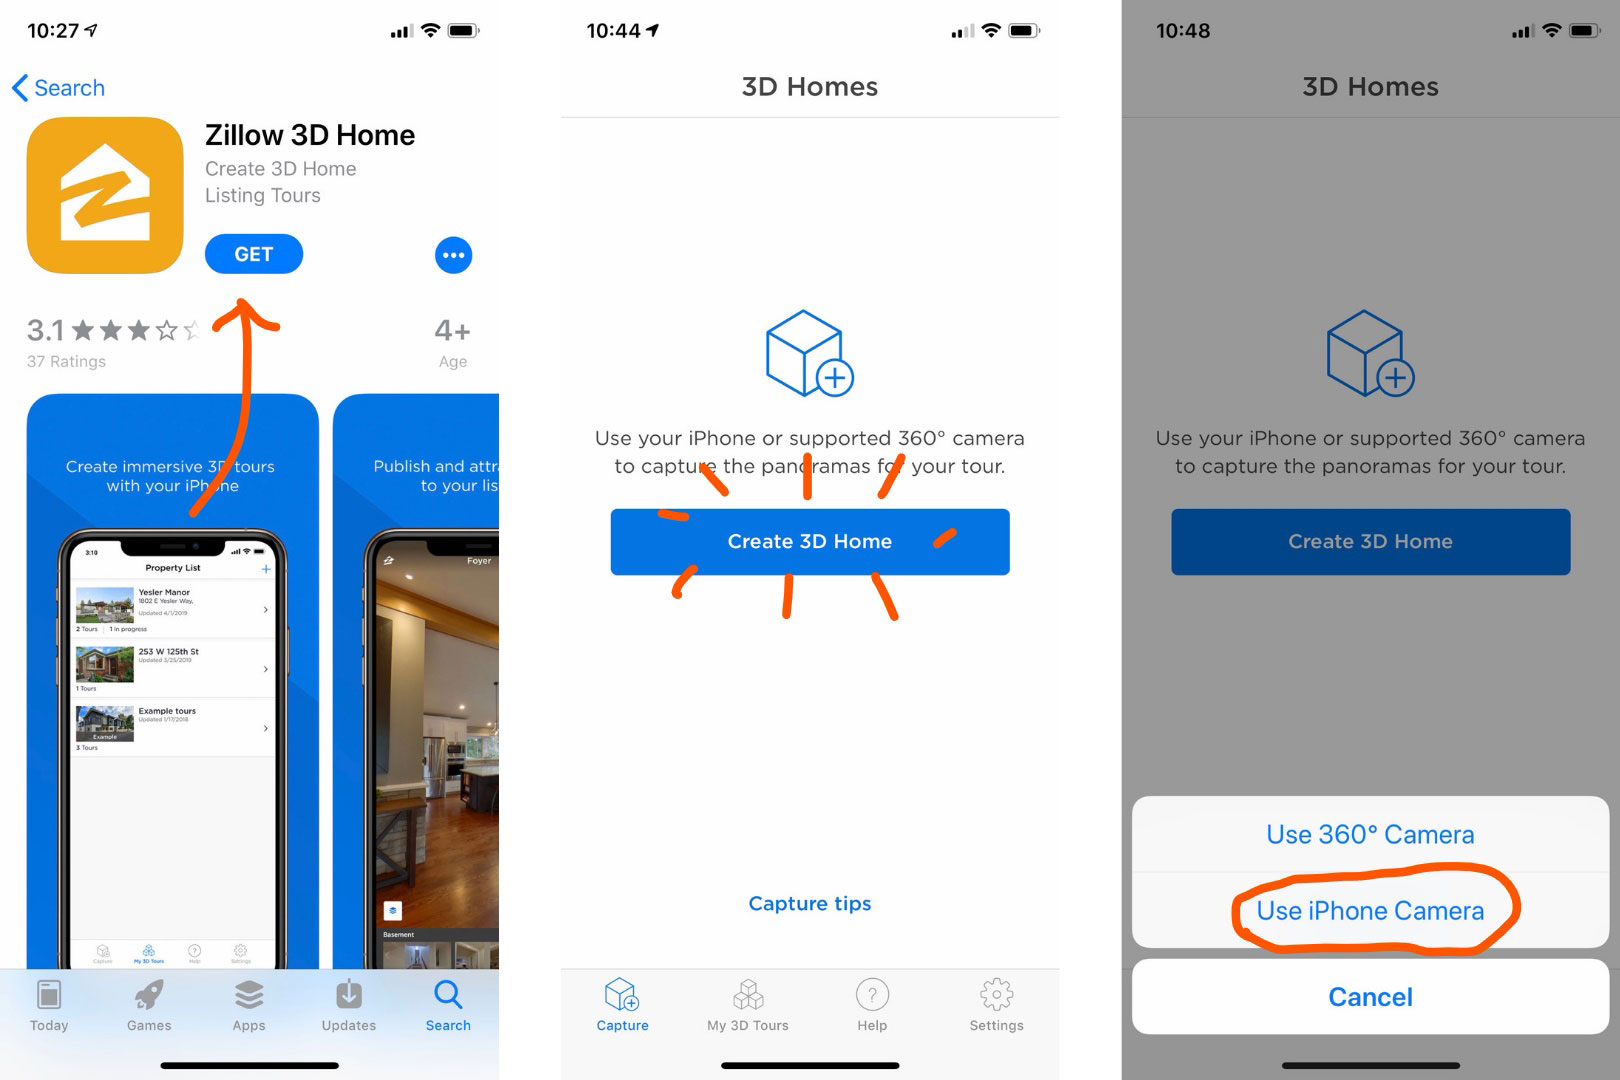
- First things first: you can download the app from the App Store (currently, 3D Home in only available for iPhone). Just search “Zillow 3D Home”.
- Open the app and sign in using your Zillow account information. Inside the app, the opening screen is the beginning of your virtual journey. Click “Create 3D Home”, then select “Use iPhone Camera”.
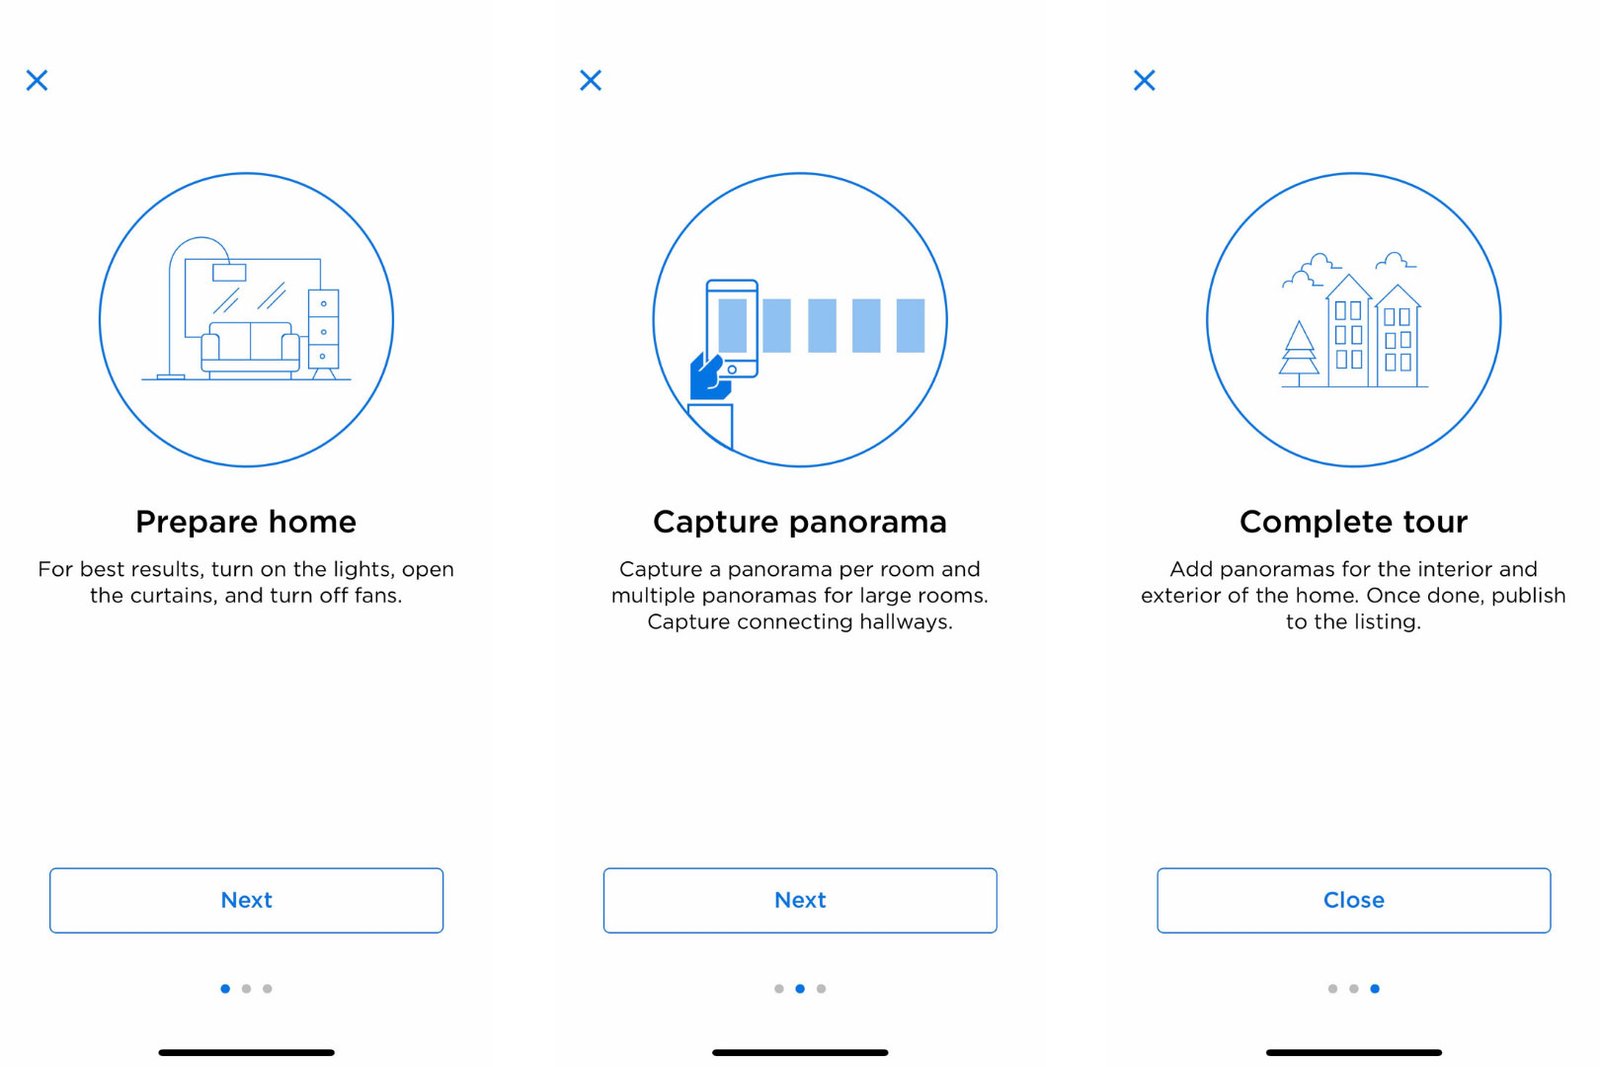
- Once you begin building the tour, the app gives you a quick tutorial for how to capture the best panoramas. Super helpful!
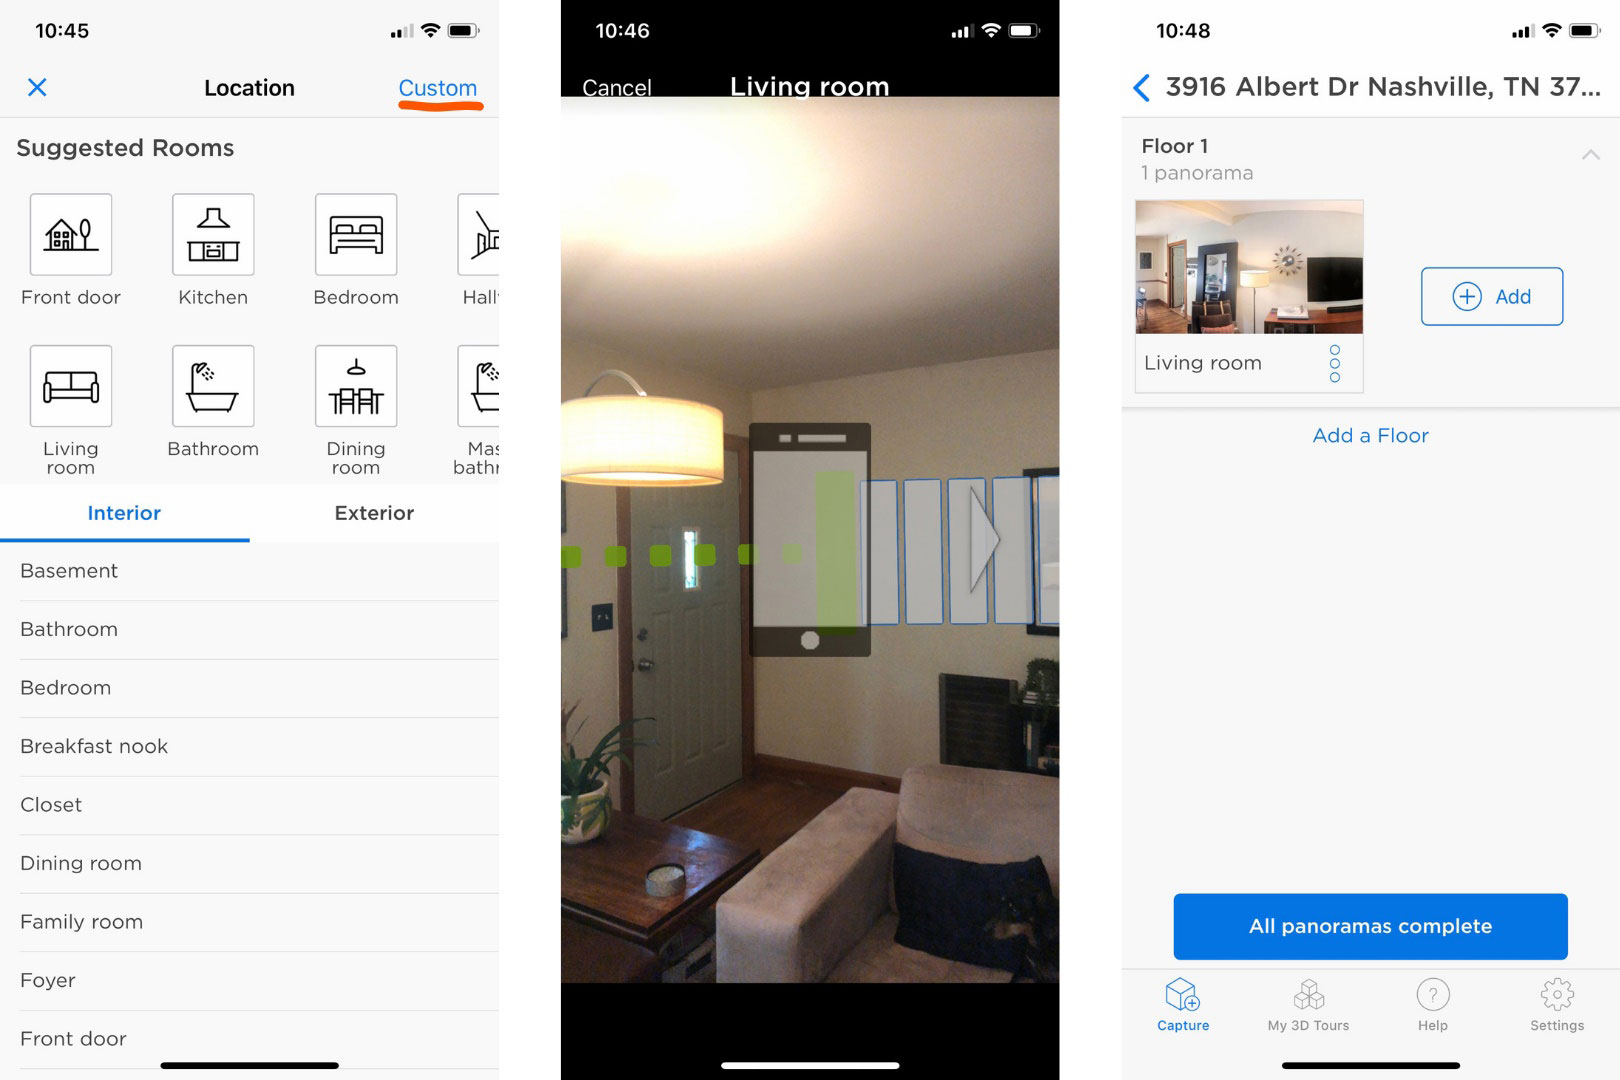
- To begin the tour, select the room you’re shooting first. The app gives you the obvious suggestions, but if you have a more unique room you can also create a custom location by tapping “Custom” in the top right corner.
- The panorama camera is actually SUPER cool. Just line your phone up with green squares and slowly turn around until the green squares end. That’s it! (Pro tip: the slower you go, the better the panorama looks. If you rush it can get messy.)
- For small rooms (like bathrooms or closets) one panorama is probably enough. For bigger rooms (living rooms, bedrooms, kitchens) you might need to shoot two or three panoramas from different places in the room. Also remember to capture transition spaces like hallways!
- When you’ve shot everything, tap the “All panoramas complete” button. JUST AN FYI: once you tap that button, you can’t add anything to the tour. If you missed something you’ll have to reshoot the whole thing. So make SUPER SURE you’re done.
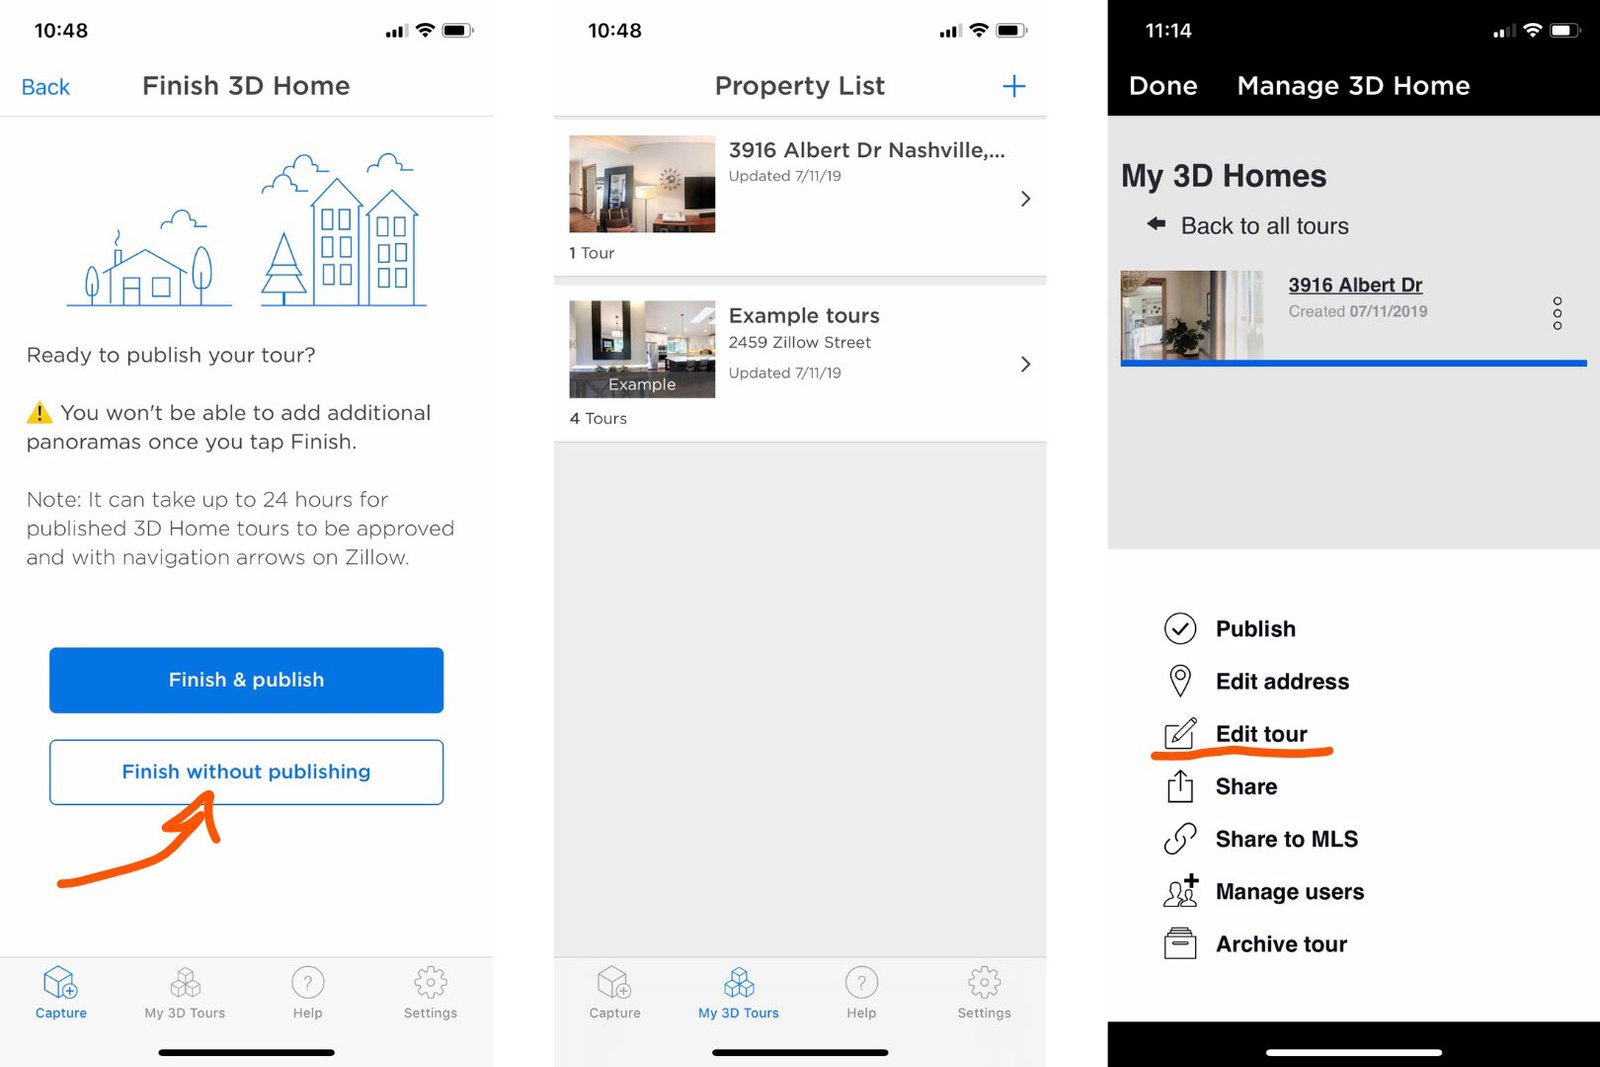
- You have two options to save your tour: Finish and publish or finish without publishing. Publishing the tour sends it to Zillow, where the actual walkable 3D tour will be created and added to your Zillow listing. Finishing without publishing leaves the tour in the app and allows you to manually add the navigation arrows. We prefer to add the navigation arrows manually. Zillow’s automatic builder does a decent job, but might not get everything just right. And adding the arrows manually is a piece of cake!
- To add navigation arrows and complete your tour: tap on the property in the Property List > tap the three dots next to the address > tap Manage > tap the three dots > tap Edit Tour.
- You will see a blue button on each unlinked photo that says “add arrow”. Tap this button and an arrow will pop up. Make sure the arrow is pointing the direction you want it to go, then tap the blue checkmark in the top right to make the connection.
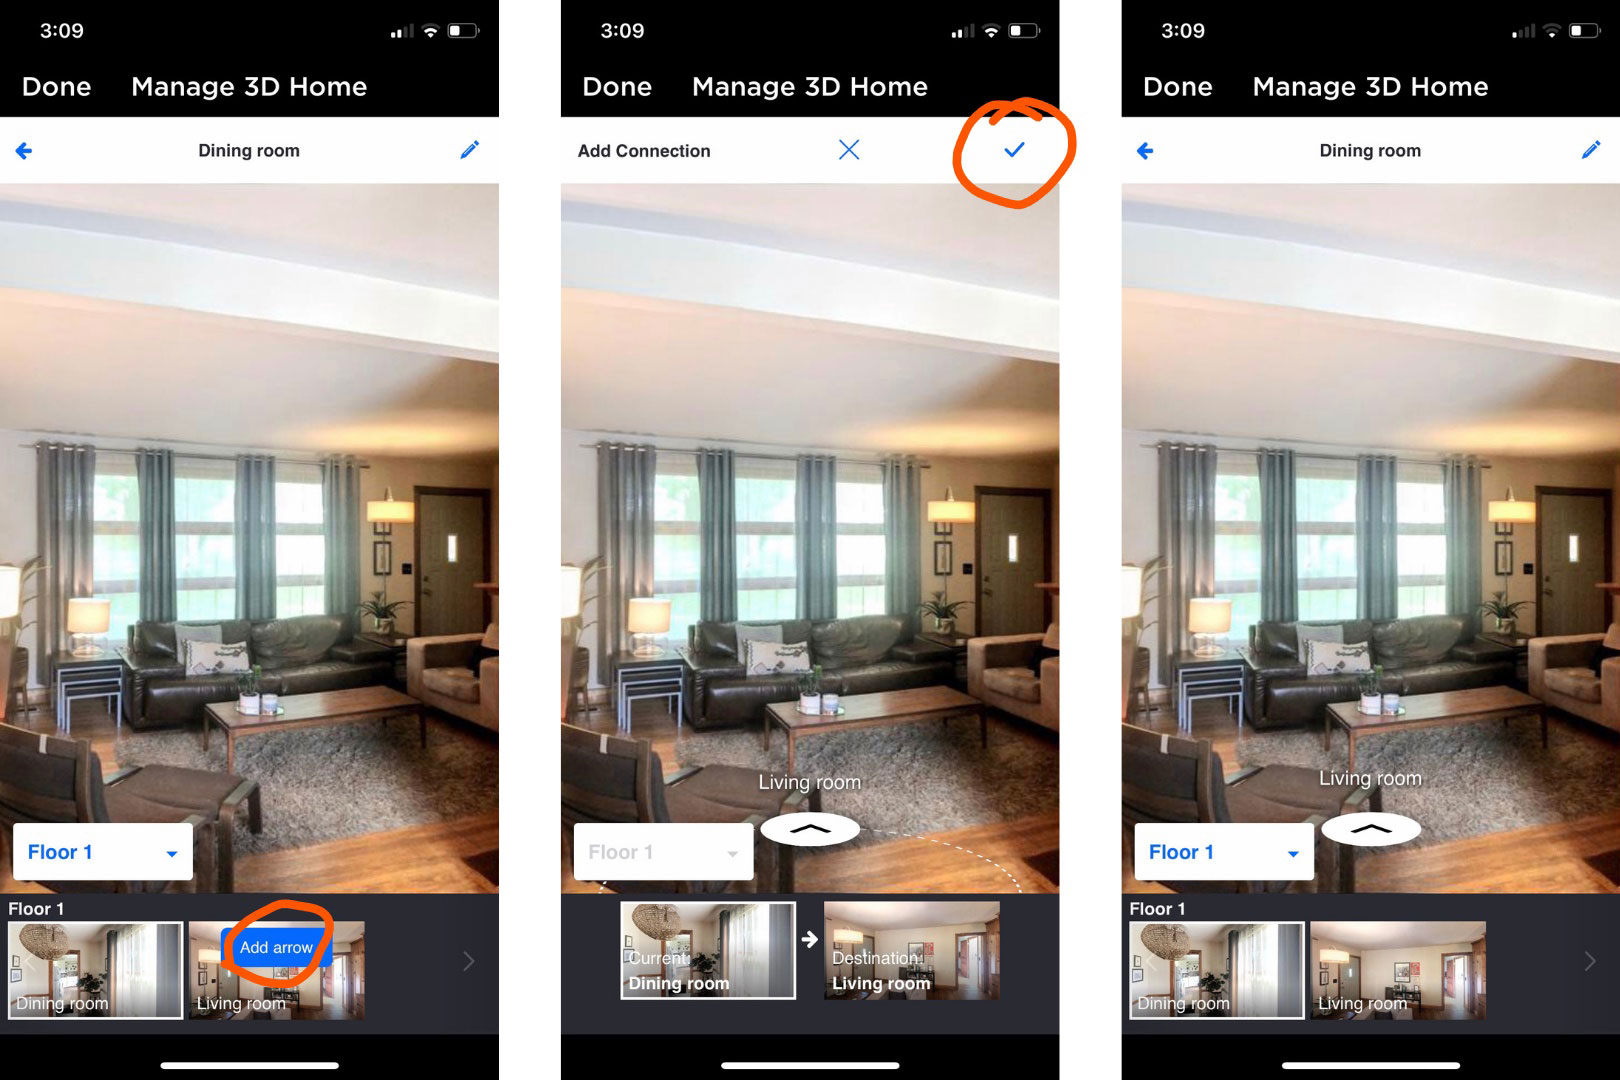
- For every connection you make, you want to make the same connection going back the other way (so that a viewer can navigate to the living room, then go back to the dining room). It’s easy to do. Once you make a connection, tap the new arrow and a short menu will pop up. Tap “Navigate”, which will take you to the other panorama. Once there, turn the panorama around until it faces the room you just came from. You’ll see the same “add arrow” button above the other panorama. Tap the button, then tap the blue checkmark to make the connection.

12. Continue making connections (going both directions) until all your panoramas are connected. Now your tour in complete! You can publish to Zillow any time.
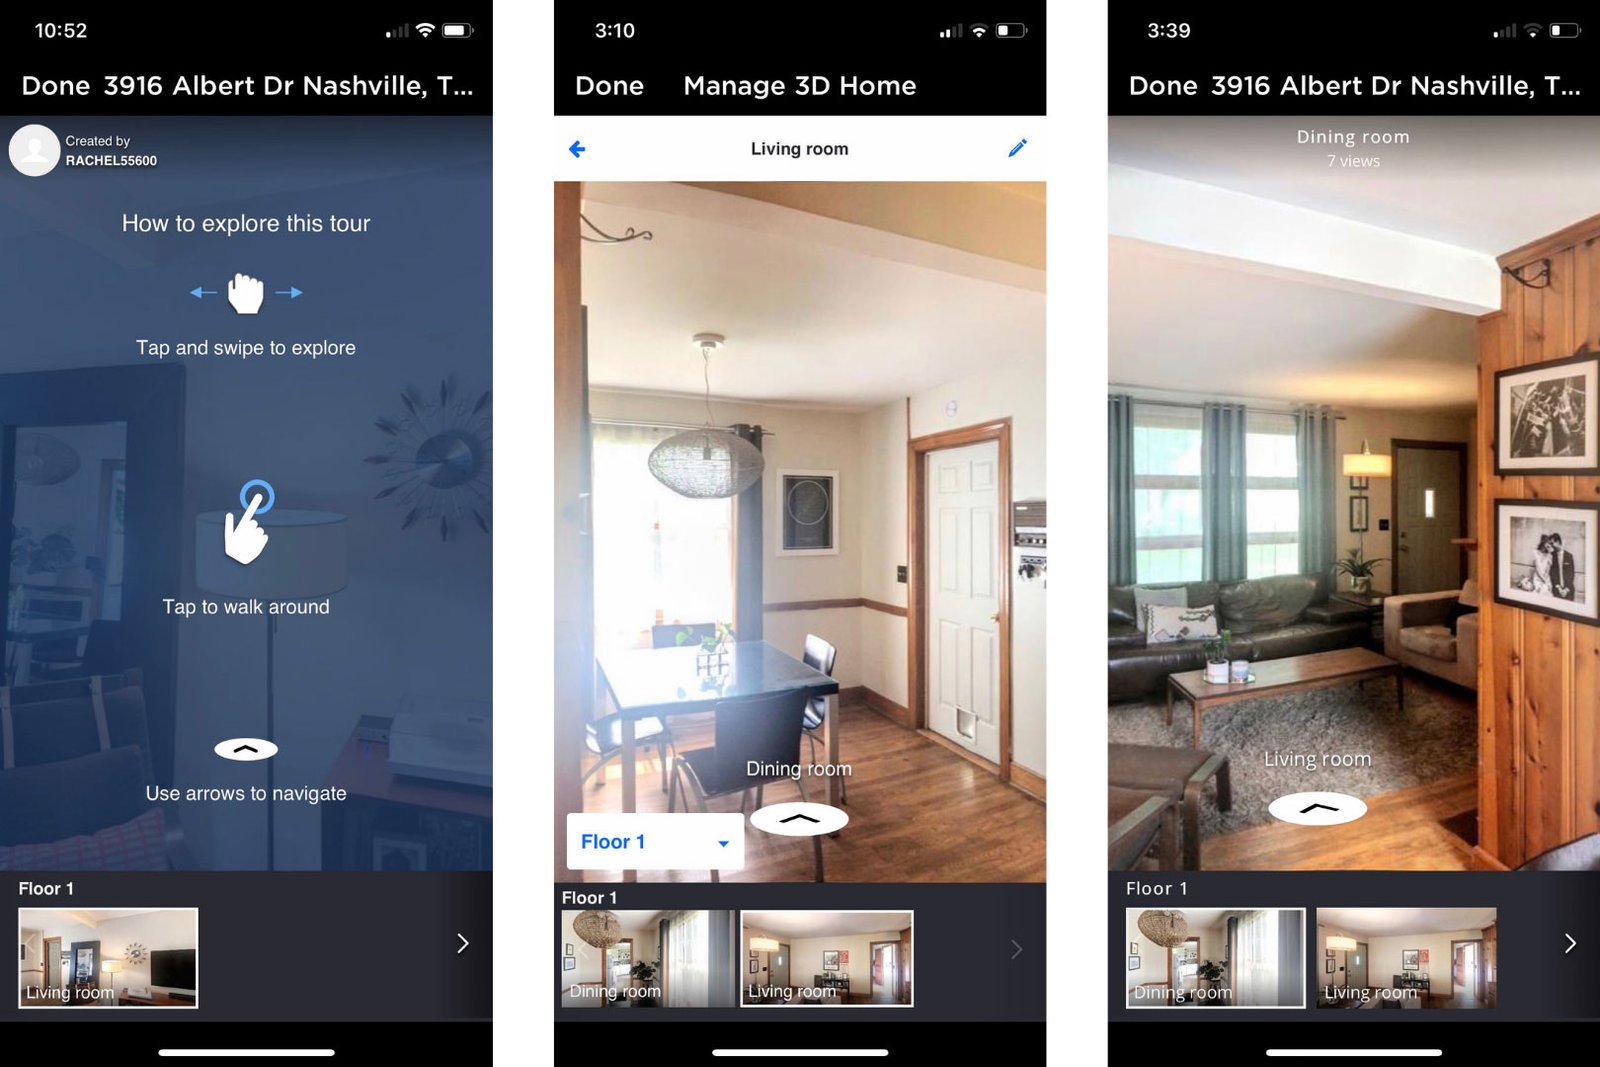
- Once you publish a tour, it will be available on the Zillow website. Go to zillow.com/my-3d-homes.com to sign in and access your tour.
And that’s it! We’d love to hear about your experience with this app. Liked it? Loved it? Hated it? Have questions about it? Did our Zillow 3D Home tutorial help? Leave a comment below!
If you’re interested in a 3D Home Tour but don’t have the time (or the iPhone) to shoot it yourself, give us a call! We’re super excited to have 3D Home tours on our official roster of services.